Author Archives: Michael Brewer

iTunes Store music is now 100% iTunes Plus

The entire iTunes Store catalog is now iTunes Plus. This means that none of the music purchased from the iTunes Store contains DRM. It also means that all of the music on the store is recorded at a higher quality.

Apple started this long, slow march with a letter from Steve Jobs titled Thoughts on Music. They updated us on the status of their efforts at Macworld in January and began accelerating their conversion to iTunes Plus then as well.

Learn more about upgrading to iTunes Plus, including what benefits may make it worth it for you.

iTunes Store adds 69¢ & $1.29 price tiers for music

At Macworld in January, Apple announced that they would be introducing three tiers of pricing to the iTunes Store. Those new pricing tiers are now active. The pricing tiers on the US iTunes Store are now 69¢, 99¢, and $1.29. The good news for modern music buyers is that out of the top ten songs on the store, only three [later in the roll-out] six of them are priced at the top tier of $1.29 – one of which is “Boom Boom Pow” by the Black Eyed Peas.

None of the top 100 songs are priced at the lower 69¢ price. Catalog items like Creedence Clearwater Revival‘s Greatest Hits do not reflect this new budget pricing tier. That album even contains a few premium tracks like “Bad Moon Rising” and “Down on the Corner.”  However, the full album is priced at a very reasonable $6.99. Finding a 69¢ song on the iTunes Store is like hunting for Easter eggs. I finally found some by looking at Kraftwerk. “Numbers” is priced at 69¢ along with six other songs. Still, this change isn’t as bad as one could have imagined. At the time of this writing only 33% of the top 100 songs are priced at an elevated level and one could have easily assumed the entire 100 songs would be $1.29.

I will continue to watch the pricing levels and will report on any large scale trends that differ from what we see today.

The reduction of Apple packaging

I’ve mentioned before that one of the ways Apple is lessening their impact on the environment is through smaller packages.

Smaller packages take fewer raw materials to construct. This means less energy needs to go into harvesting those materials and producing the packaging. It also means less material needs to be recycled and less material will undoubtedly end up in landfills.

Reduced packaging also means that more units can be transported or stored in the same amount of space. Fewer plane or train miles are required to transport the computers and other devices from the manufacturing plant to the point of sale. Retail stores can stock more Macs and iPhones in the same square-footage (or less) store which puts fewer demands on real estate acreage and requires less energy for lighting, cooling, or heating.

Author and developer Jeff LaMarche just got a 17″ MacBook Pro and offers some photographic evidence of the progression of smaller and smaller packages from Apple.

What is Spotlight?

Spotlight is a feature that was added to the Mac a while back with the release of Mac OS X Tiger. It is a way to search your hard drive to find the file you need. That sounds pretty simple doesn’t it? Well, it is.

Spotlight always knows what is on your hard drive. It doesn’t have to go through a periodic process to update its index. If you have a Finder window open with “aubergine” in the search field, and let’s just say you don’t have any files that refer to eggplant as aubergine, the window will be empty because it could not find that word in anything. Now add a new document named “ratatouille” and type “aubergine” in the document somewhere. Immediately after you save that document, the ratatouille file will appear in your Finder window.

That example was meant to illustrate how quickly Spotlight knows about what is on you computer. But, it also illustrates another feature of Spotlight. The ability to search for stuff inside of files. And it does that just as swiftly. But it doesn’t end with finding text inside of a document, you can search to see which photos you took with a Nikon camera instead of your Canon. You can search for anything on one of the cards in your Address Book. You can search for almost anything.

The easiest way to use Spotlight is to click on the magnifying glass icon in the right side of your menu bar – Apple has a guideline of always putting the search field in the top-right corner of a screen or window. A search field will drop down that you can start typing into. Wait… now might be a good time for me to explain what I mean when I say “search field.” Everyone knows what a text field is, it’s a place to store some text that the user types in or that the computer fills in. Apple has a distinct version of a text field that they call a search field. They’re immediately recognizable because they have rounded sides giving them a pill-like appearance. There will be a magnifying glass in the left side of some of them. If that icon has a little downward facing triangle next to it, you can click on the icon to select recent searches you’ve made.

OK, with that bit of exposition out of the way, lets get back to the Spotlight menu. As I was saying, it is in the top-right corner of the screen. Click on the Spotlight icon and type something into the search field. As you are typing Spotlight will begin searching your computer and returning results. For example, aubergine begins with “au.” If I have anything about Australia, it will show up in the Spotlight menu until I type the “b” in aubergine. Yes, it’s that quick. The Spotlight menu categorizes everything it finds and will return the first few items for each category. If what you’re looking for isn’t there, select the Show All item at the top of the menu. This will open a Finder window with all of the results. By the way, you can rearrange categories and eliminate specific ones from the Spotlight menu by changing your System Preferences for Spotlight. There is also a preference for hiding specific locations from Spotlight.

Get familiar with the Spotlight menu, it's a real time-saver

Get familiar with the Spotlight menu, it's a real time-saver

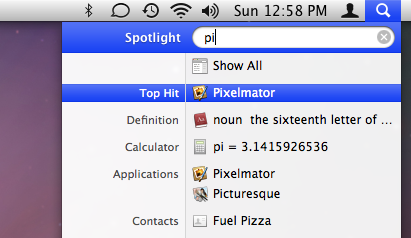
I said this is the easiest way to use Spotlight. It is and it is also one of the easiest and quickest ways to launch an application. If Spotlight finds an application that’s name matches your search term, that application will be the Top Hit. For example, when I want to launch Pixelmator, I use the Command+Space keyboard shortcut to open the Spotlight menu and then type “pi” followed by the Return key. Since Pixelmator is my Top Hit, it is already highlighted and hitting Return will open it. If I wanted to open my contact card for Fuel Pizza, I would use the down arrow key to move the highlight down until I had selected Fuel Pizza and hit Return. You can also select items from the menu with your mouse.

Have you ever tried to open a file from inside an application and had trouble remembering where it is? No need to answer; that was a rhetorical question. I know the answer is “yes” because it happens to all of us. With Spotlight, you don’t need to remember where it is. Just remember enough about the file so that Spotlight can find it. Every File Open window in Mac OS X has a search field in the top-right corner. Enter your search terms in there and the contents of the sheet will show the results. As with the Finder, you’ll also see a little Spotlight toolbar at the top of the results area. This will allow you to refine your search. It will have a few file locations that you can limit the results to. But, it also has a plus button that adds additional layers of refinement to your search. Clicking that plus button allows you to refine your search by all sorts of things like the kind of file, the camera aperture setting for each photo, and the bit rate of audio files.

This should get you well on your way to becoming a Spotlight guru. Let me know what questions you have about Spotlight and I’ll answer them.

Great unit conversion app for the iPhone OS

On the Mac, I love using Apple’s unit converter Dashboard widget. I have wanted something like that for my iPhone, but I haven’t seen anything that looked as easy to use… until now.

Tapbots has released their new application Convertbot [app store link] – and it is great. You can tell they really focused on the user experience before they ever started up Xcode. You’ll use the (now almost instinctive in humans) iPod touch wheel motion to select the conversion units for whatever you’re converting. Then, you tap on the read-out to bring up a number pad for entering what you need to convert. That’s about it.

Tapbots has a great demo on their Convertbot page. I encourage you to actually watch their demo movie rather than just the animated iPhone on their site. The animation seemed confusing to me at first, but their demo explains everything and really shows how easy to use Convertbot is.

The only fault I can find with this app is that it seems like it should start up faster than it does. It may be waiting to update currency exchange rates before displaying the interface. Don’t get me wrong, though, it doesn’t take as long as some games do – I can’t count to “Three-Mississippi” before it is ready.

Keeping your Mac’s Trash in the corner

One of the first things I do on any new Mac is change the Dock so that my Trash is always in the corner rather than floating around as icons are added or removed from the Dock. This makes it very easy to drag items to the Trash because it’s always in the same spot. It’ll always be in the bottom-right corner if your Dock is positioned on the bottom or the right of the screen. And Trash will be in the bottom-left corner if your Dock is positioned on the left of the screen.

You have to set the Dock preferences so that the end of the Dock is pinned to the edge of the screen. But wait, that doesn’t show up in System Preferences for the Dock! Instead, you have to use the Terminal to enter some commands to set a hidden preference. This is really easy to do even if you’re not comfortable with the Terminal application or command line interfaces in general. But, typing the wrong thing into the Terminal can be fairly destructive – you’ve been warned. If you’re ready, Terminal can be found in the Utilities folder within your Applications folder.

Just type the following commands into Terminal one after the other and your Dock will disappear for a second and when it comes back the Trash will be in the corner.

defaults write com.apple.Dock pinning end

killall Dock

8 tips for new iPhone users

Recently a couple of friends got their first iPhones and asked me for some help on how to do a few things. I thought that I should document these tips as well as a couple of extra ones on how to use some of the less easily discovered features of the iPhone. I’ll also let you know about some of my favorite applications and games.

How do you add applications to the iPhone?

There are two ways to get new applications into your phone. You can download them from the iTunes Store on your Mac or PC and then synchronize your iPhone with iTunes. As long as you have your phone set to synchronize applications (this preference is on the Applications tab after selecting your phone in iTunes’ sources list), it’ll automatically add the new applications to your phone.

App Store iconThe other way to add new applications is to run the App Store application directly from your iPhone. You can download any application directly to your iPhone and it will be synchronized back to iTunes the next time. If the application is larger than 20 Megabytes, then you must be connected to a Wi-Fi network in order to download it.

How do you remove applications from the iPhone?

This is easy to do, but isn’t very intuitive. All you have to do it place your finger on the application you want to remove and hold it there until the icons start to jiggle. The applications you can remove will all have an X button in the top left corner of their icon. Tapping this button will remove the application from your iPhone and will also tell iTunes not to synchronize the application back to your phone again – unless you re-select it on the Applications tab of your iPhone’s iTunes preferences.

Tapping on the X button will remove any of these apps

Tapping on the X button will remove any of these apps

How do I re-arrange the application icons?

As described in the above tip, just hold your finger over an application until the icons start to shake. The application icon will grow in size and become translucent to indicate that you have grabbed it. You can then drag the application to wherever you’d like it and you’ll see the icons re-organize themselves. If you want to drag it to another page, just hold your finger to the left or right side of the screen until the next page slides into view. While the icons are jiggling around, you can drag and drop any of them to re-order your applications.

What are the fastest ways to call people?

First off, if you haven’t done this, add some people to your Favorites list in the Phone application. You can click the plus button in the top-right corner to select one of your contacts to add to your Favorites. You can also add someone to your Favorites as you’re looking at their address card. Simply select someone from the Contacts tab of the Phone application or the stand-alone Contacts application, and scroll all the way to the bottom of their card. Tap the Add to Favorites button that shows up on the bottom right. If this person has more than one number, you’ll be prompted to select which one you want to add to your Favorites. This ensures that every person on your Favorites list can be called with just one tap.

If you need to call one of your favorite people at a different number than the one that shows up in your Favorites list, tapping the blue detail disclosure button to the right of their name will take you to their card and allow you to dial any of their other numbers, send them a text message, write them an e-mail, etc.

Have you ever been in the middle of a texting conversation when you realize it’d just be easier to talk on the phone? Scroll all the way to the top of your text view and tap on the Call button. If your conversation is long, the quickest way to scroll to the top of the view is to tap on the status bar at the top of the screen that contains your battery and signal indicators – it’ll snap you directly to the top.

Maybe it'd be a good idea to use this phone for... talking

Maybe it'd be a good idea to use this phone for... talking

You can do the same thing with e-mail. If you want to talk to someone rather than reply to their mail, tapping on their name will take you to their contact card and you can call them from there. This works for anyone in the header of your e-mail regardless of whether it was a message you received or sent or whether the person was directly addressed or not. This is also an easy way to start a card for a new contact. Their name and e-mail address will be pre-filled for you.

Tap the detail disclosure button to talk to your local barista

Tap the detail disclosure button to talk to your local barista

The Maps application is also a good place to start a call. If you were using it to get directions to a friend’s house but are having trouble finding it, you can click on the blue detail disclosure button next to their name after tapping the red destination pin. I also use Maps as a way to find the number of local restaurants and other places. Just tap on the detail disclosure button on the label for any of the pins that drop in after you search for something.

What is the best way to delete e-mail?

Obviously, you can delete a message while you’re reading it by clicking on the trash can button in the toolbar at the bottom of the screen. But, you can also quickly delete a message after reading its summary in your inbox by swiping your finger left to right across the row for that piece of mail. Then just tap the Delete button to confirm that you really want to delete it or tap the Done button to cancel.

What if there are a lot of messages that you want to clear out of your inbox (or any other folder)? You can tap the Edit button in the top-right corner of the screen. It’ll change the list to editing mode that gives you a circle to the left of every message and Delete and Move buttons at the bottom of the screen. Tap on the circle to fill it in with a check mark for every message that you want to get rid of. If you accidentally selected a mail in error, you can tap the check mark to undo your selection. Once you’ve selected everything, tap either Delete or Move.

How do I reset the iPhone?

If one of your applications freezes and you need to stop it so that you can get back to using your phone, there are three things you can try. The first thing to do is to double-tap the home button to pull up the app switching tray. From there, tap and hold the icon until they start to jiggle and then quit the app by tapping the red circle with the dash in it. If that doesn’t work, try turning off the iPhone by holding down the lock button on the top of the phone until a “slide to shutdown” control appears. If not, you’ll have to resort to resetting your iPhone by holding down both the home and lock buttons for around 10 seconds until the Apple logo appears in the middle of the screen.

Apple has a page that helps you trouble shoot this problem if this doesn’t work for you.

What are some great applications?

Amazon Mobile is a great application for shopping at Amazon. Searching returns an easy to read list with photos and pricing information. And once you select a product it gives you a lot of information summarized nicely with the option to drill down for more info. It also works with the iPhone’s camera by allowing you to take photos of things that it will then try to find via Amazon Remembers while you continue shopping. When it finds a similar (or the exact same) product, you can easily buy it right there.

Deliveries is a utility app that tracks the shipping status of any deliveries you have. You can enter tracking numbers for a variety of different courier services and it even synchronizes with a companion Dashboard Widget for the Mac.

Remote is an application from Apple that gives you the ability to remotely control either iTunes or an Apple TV. I use this all of the time to pick what music I want to listen to on my Apple TV.

Shazam is an application that listens to music in the environment around you and identifies it for you! That really speaks for itself. But it will also remember songs it has identified in the past and will link you to iTunes, YouTube, and more for any song that it recognizes. And in my experience, that is most songs.

Articles is a great way to read Wikipedia. It reformats all of the encyclopedia entries in a way that is very easy to read on an iPhone. Like with Safari, you can have many articles open at once and switch between them easily. It can also be used to find a word or phrase within long Wikipedia entries. And Articles has a really great image viewer built in. This is as close as you can get to having The Hitchhiker’s Guide to the Galaxy in your pocket.

Yelp is a really good application for finding the best restaurants, cafés, bars, etc. around you and getting a good idea of whether you should go there based on the reviews done by the Yelp community.

What are some great games?

Burning Monkey Casino is a stylish app with an array of casino-themed games to play including slots, blackjack, video poker, money wheel, pachinko, scratch-and-win cards, and 3 Card Monty. You even can “cheat” at pachinko by tilting your iPhone. The Burning Monkey Casino also has a lounge act and stand-up comedian for your pleasure.

Deep Green is a very cleanly designed chess game. You can play against another person or the Deep Green chess engine (which has adjustable strength). You can undo your moves all the way to the start and you can also have your next move suggested to you. Deep Green also remembers the game between play sessions.

Koi Pond is a way to relax with your iPhone. It’s basically what it sounds like, with nicely rendered fish swimming around in a virtual pond. You can cause ripples by tapping the screen or moving your finger across the face of the water. But that scares the fish away. If you leave your finger in one spot on the screen the koi will come nibble at it. You can feed the fish by shaking your iPhone. They even added rain to their most recent update.

Morocco is cool take on Reversi (also known as Othello). This reminds me a lot of Deep Green. It’s very cleanly done, has multiple difficulties, and remembers your game when you quit the application.

Rolando is close to the perfect iPhone game. You control the characters by tilting the iPhone to the left or right and you interact with them and the environment by tapping on the screen or a variety of other gestures. If you’ve ever heard of Loco Roco for the PSP, this is the way that game should have been.

Super Monkey Ball is a new version of a great video game that has appeared on several gaming systems including the Wii. But, it feels the most natural on the iPhone. You tilt the iPhone to control which way the monkey ball rolls. Doing this, you’ll roll around the labyrinthine levels collecting coins and racing your way to the finish line.

Trism is one of the first games to come out for the iPhone. And it, like Rolando, incorporates touch & tilt as key parts of the game play. Slide the Chiclet-like triangles around to match up three or more pieces of the same color to annihilate the pieces and then tilt the phone to control which pieces slide into the space left behind. Maybe you should listen to The B-52’s while playing this game.

WordJong is what you get when you combine mah-jongg and Scrabble. Letters replace the Chinese characters on the mah-jongg tiles. And you’re taking letters off the board instead of placing them on it as in Scrabble. A new puzzle is given to all players of the game every day, so you can compete for bragging rights with your friends.

Make your own Ferris Bueller’s Day Off soundtrack

John Hughes, the director of Ferris Bueller’s Day Off, never released an official soundtrack because he thought the selections were too eclectic. But, you can assemble most of it on your own by getting the songs from the iTunes Store. They’re not all currently available, but most of them are. I update this list whenever more songs are made available.

Love Missile F1-11” by Sigue Sigue Sputnik

“Jeannie” (Theme from I Dream of Jeannie)

“Beat City” by The Flowerpot Men

Star Wars Main Title / Rebel Blockade Runner” by John Williams

“Please, Please, Please Let Me Get What I Want” by The Dream Academy

Danke Schoen” by Wayne Newton

Twist and Shout” by The Beatles

Radio People” by Zapp

“I’m Afraid” by Blue Room

The Edge of Forever” by The Dream Academy

March of the Swivelheads” by The English Beat

Oh Yeah” by Yello

Bad” by Big Audio Dynamite

Life moves pretty fast… You don’t stop and look around once in a while, you could miss it.

Video stabilization & more with iMovie ’09

I’ve put together an example of what you can do with the new iMovie ’09. I recorded the video this weekend using a Canon HG10 high definition video camcorder. I then edited it using iMovie ’09. I didn’t spend a long time editing this movie. I let iMovie make most of the decisions and as a result was done in less than 30 minutes.

Themes

Themes are a new feature for iMovie ’09 that iMovie ’08 did not have. Older versions of iMovie did have themes as well, but they were one of the features removed when Apple completely re-wrote iMovie for 2008. iMovie currently has five themes: Photo Album, Bulletin Board, Comic Book, Scrapbook, and Filmstrip. Apple generally adds to the selection every time a new version of iLife comes out. You can select the theme you wish to use when creating a new project and you can optionally tell iMovie to add transitions and titles. You can also change them or remove them from either the titles or transition section.

My video has the Comic Book theme applied to it. The theme is responsible for generating all of the animated transitions and titles. In fact, it was also responsible for the placement of them all except for two lower-third titles that I placed at about 5:04 into the video.

Video Stabilization

iMovie analyzed all of my video for stabilization right after it was done importing it from my camera. That took about two hours for around 18 minutes of footage (you could reduce this by telling iMovie exactly what you want to smooth the camera movement for, but I let it run over night) This analysis lets iMovie know how to alter the video to reduce camera shake and make your camera movement smoother.

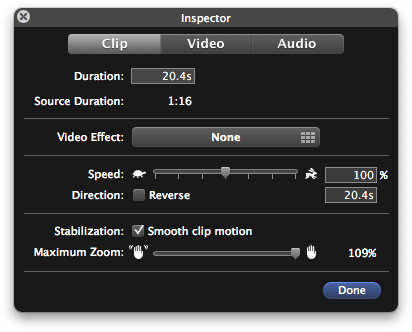
Another one of the tricks iMovie uses is zooming in to help it reduce shakiness. It gives you a slider that allows you to adjust the level of zoom to use to stabilize your video. And, your clip will have an icon that changes as you adjust the slider to show you how well iMovie can stabilize that video clip.

iMovie '09's Clip Inspector lets you adjust the zoom used to stabilize your video

iMovie '09's Clip Inspector lets you adjust the zoom used to stabilize your video

All of the clips used have video stabilization enabled and I left them at the zoom factor that iMovie picked for each. You can see two things about video stabilization in the end result. It does a good job of smoothing out the camera shake – all of my video was shot with the camera in one hand and a coffee in the other. And there is a waviness to some of the stabilized video – apparently this is a result of the CMOS sensor my camera uses. According to Apple, you’ll get better results with other cameras.

The example video is below, and you can see the same video without stabilization on YouTube.

Notes

The soundtrack for this video is courtesy of Nine Inch Nails through Creative Commons Attribution-Noncommercial-Share Alike licensing and the songs appear on the “Ghosts I-IV” album. The first song is “18 Ghosts II” and the second song is “24 Ghosts III.”

Multi-button mousing with your Mac

One of the biggest issues that detractors of the Mac have had over the years is that Macs don’t work with two-button mouses. And one of the curious things about detractors of the Mac is that they apparently have never used one. Macs work with multi-button mouses. They have done so for years. Until recently, Apple only sold one-button mouses, but Mac OS X has supported multi-button mouses since it was first released on March 24, 2001. Apple now only sells multi-button mouses.

The multiple button Mighty Mouse that Apple designed retains the overall form of the Apple Mouse that it replaced and works as a single-button mouse for those that don’t feel the need for multiple buttons and to reduce stress on the index finger since the mouse can be clicked with your entire hand.

So, if you feel the need to right-click, you’ll want to change your system preferences since the mouse defaults to acting like one with a single button. System Preferences are accessed through the Apple menu in the menu bar. Select the Keyboard & Mouse icon that is in the Hardware grouping. Then select the Mouse tab at the top of the window and you’ll see all of the preferences you can set for your mouse. By default both the left and right side of the mouse are set to act as the primary button. Regardless of which side of the mouse you click on, it’ll always register as a “left-click.” So, you’ll want to set one of those to the secondary button. If you’re a right-hander, then you will be most comfortable setting the right side to the secondary button. Keep in mind that the secondary button is registered if only that side is touched when you click the mouse. I really like this feature because I can still use the mouse like a single-button mouse (clicking with my entire hand), and when I need to context-click on something I just click on the right side of the mouse.

You can also set what happens when you click either the scroll ball or the side buttons. There is a key on your keyboard that will activate the Dashboard, so I don’t understand why Apple defaulted the scroll ball to this function. And, the Exposé key on your keyboard will reveal all windows for you, so the side buttons could also be put to better use. My recommendation is to use the two extra mouse buttons for Exposé, but you can set them to whatever you want. I’ve got the scroll ball set to show me the windows for my current application (Exposé – App Windows) and the side buttons set to expose the desktop (Exposé – Desktop). I feel this is best because if you’re going to your desktop, you’re probably going to be dragging something to or from it and dragging works well with the side buttons. You can also see from the screen shot that I increased the tracking speed to be closer to what I was used to on Windows. Adjust this slider to whatever makes you comfortable.

Now you’re all set. You can close the system preferences and use the mouse the way you want to from here on out. Just remember that if you have more than one account set up on your Mac, the other people can configure their own preferences for the mouse. So, you can turn on all of the buttons on your account but make all of them (including the scroll ball and side buttons) act as the primary button for your young child’s account.