Category Archives: Macintosh

New to the Mac? This category will help you make the transition with guides and tips on how to begin using the Mac and how to grow with yours as you become more comfortable in your new environment.

The Ghost of Xserve Future

In late 2010, Apple announced that they would cease production of the Xserve. That meant two things about the future of Apple hardware to me. It meant that new designs for both the Mac Mini and the Mac Pro would be more supportive of playing a server role.

Apple updated the Mac Mini in the middle of 2011 and proved me half right. The new Mac Mini shedded an optical drive in favor of opting for a second drive to increase storage capacity and it packed vastly improved processing power. With OS X Lion Server available from the App Store, a Mac server can be had for as little as $650 today. Apple also offers a faster, pre-configured Mac Mini with Lion Server for $1000.

Amazingly, Apple hasn’t refreshed the Mac Pro since the current model was released in the middle of 2010 before they axed the Xserve. Despite this long wait, I do think that Apple will update the Mac Pro contrary to some of the rumors swirling around. How? This is just a guess, naturally, but the new Mac Pro will be smaller and will be designed to stand vertically, horizontally, and easily be stored in a server rack. This means the Mac Pro could return to the legacy desktop computer form factor that littered desktops and elevated monitors in the nineties—elegantly refined by Jonathan Ive, of course! I doubt the optical drives will survive in a refreshed Mac Pro which will probably result in a boost to sales of Apple’s external SuperDrive. These changes are but one of the many ways Apple could make the Mac Pro more favorable for places that want a Mac server. I’m looking forward to seeing how Apple does it if they complete my prophecy next week at WWDC.

Faster Dock-action while in full screen

Do you love using apps in full screen mode in Lion but wish that it was easier to get to the Dock? If you’re comfortable mucking about in Terminal’s command line, you’re in luck. You can type the following command to make the Dock instantly appear as your pointer hits that bottom of the screen.

defaults write com.apple.Dock autohide-delay -float 0
killall Dock

Don’t worry, that second line just restarts the Dock with the new setting in place. It doesn’t hurt anything or anyone.

Type this to get back the behavior as Apple intended.

defaults delete com.apple.Dock autohide-delay
killall Dock

Video pros feel scorned by Apple

In an Ars Technica article on Why the video pros are moving away from Apple, Jacqui Cheng writes mostly about how video professionals aren’t happy with the changes Apple made in Final Cut Pro X. Even though the changes they’re most unhappy with are similar to Apple’s abandonment of the 3.5” floppy drive and legacy connection ports with the first iMac. Changes that upset some people at the time, but that the entire computing industry is better off for.

While investigating whether Apple’s pro video market was already shrinking prior to Final Cut Pro X’s release or whether it is solely in response to that release, Jacqui uncovered some resentment towards Apple’s hardware releases. Evidentially video pros look at the huge successes Apple is having with the iPhone and iPad and feel neglected. Some of them evidentially think that Apple is putting all of their energy into releasing consumer products and they’re suffering as a result. They cited how long in the tooth the Mac Pro is getting as evidence of Apple’s inattention.

With the current iteration of the Mac Pro about to turn 18 months old—and even at the time of that update, the previous version was nearly two years old—these users are becoming increasingly jaded about Apple’s commitment to the pro market. And because Apple’s Final Cut products only work on the Mac, the Mac Pro is a big part of the equation when it comes to production houses choosing which software to use.

They’re worried that 18 months between Mac Pro revisions mean that Apple is neglecting the pro market. They feel that Apple wouldn’t let that sort of thing happen to their prized iPhone or iPad. Except Apple has. The iPhone 4 was on the market for 16 months before being replaced by the iPhone 4S.

Maybe video professionals need to reset their expectations. Set aside feelings of not being important enough. Just concentrate on who provides the best video production software for you today and who will provide the best in the future. It might be Apple.

Pages can now create ePub files

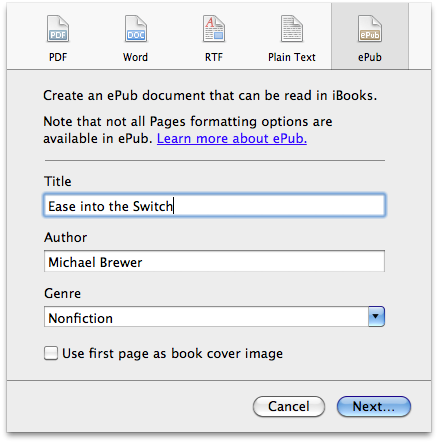
Apple released an update to iWork this week that, among other things, adds the ability to export ePub documents to Pages. This is the fifth file format that Pages can export alongside PDF, Microsoft Word, RTF, and Plain Text. But, what this really means is that normal humans finally have a way to create e-books for their favorite e-reader.

Alongside this update to Pages, Apple has also published a support document that provides some guidelines for when you should use ePub and when you should use PDF. Simply put, if the layout is more important than the text use PDF, otherwise ePub is ideal. Fortunately, iBooks for the iPad and other iOS devices can display both ePub and PDF documents.

In their support document, Apple also provides an “ePub Best Practices” Pages document that you can use as a template for any new e-books that you want to create. They also provide instructions for importing the styles from the template into an existing document to provide the structure needed by e-book readers to for the table of contents and navigation.

You can use the first page as the cover, but it looks odd.

Actually exporting the ePub file is easy enough. Simply select the Export option from the Share menu and you’ll be presented with a sheet where you can select ePub as the format. You’ll then be asked for some basic meta-data about the document. Once you’ve entered the Title and Author, you can press the Next button to choose a location to export to. And, that’s it. Just drag the file onto the iTunes icon in your dock and sync it to your iPad, iPhone, or iPod touch. You’re done.

I used Apple’s template to convert the original “Ease into the switch” article into an ePub book. Download it to see what kind of results you can get from just a few minutes of reformatting.

One question remains; when does this come to the iPad version of Pages?

Ctrl-Alt-Del

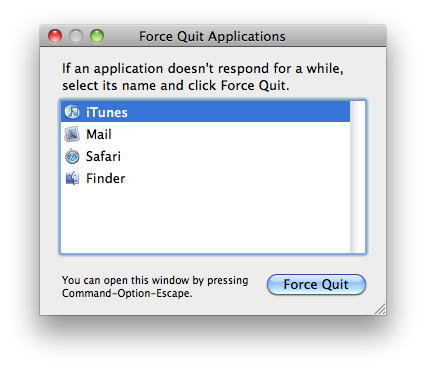
There is a Mac-equivalent of the popular Windows command Ctrl-Alt-Del that is often lovingly referred to as the three finger salute. You just don’t have to use it anywhere near as often. If one of your applications isn’t responding, you can bring up its contextual menu in the dock by either right-clicking, control-clicking, or click-and-holding (clicking down on the mouse, but not up until the menu appears) on its Dock icon. This will allow you to choose the Force Quit command to… well, force the application to quit. But, there is another way as well.

Select any application and press the Force Quit button

Select any application and press the Force Quit button

You can also press the Command-Option-Escape keys on the keyboard to bring up a Force Quit Applications window. From this window, you can select the application that isn’t responding and press the Force Quit button. Pressing Command-Option-Escape again while this window is front-most will force the Mac to restart.

How to remove icons from your menu bar

When you first start using your Mac, you may have quite a few items in your menu bar. I don’t feel the need for the Bluetooth or Input menu items and I prefer an uncluttered look, so I’ll remove them. But how do you do that?

You can easily remove any of these icons you don't need.

You can easily remove any of these icons you don't need.

There’s nothing in each one’s menu to allow you to remove them and there aren’t easy to find settings for them in System Preferences (though, they are usually scattered around there). If you want to remove one, just hold down the (Command) key and drag it out of the menu bar. Lift your finger to stop dragging once you’re clear of the menu bar and poof it’s gone. This is similar to how you can drag icons out of your Dock  – only with that you don’t need to hold down the option key.

What is Spotlight?

Spotlight is a feature that was added to the Mac a while back with the release of Mac OS X Tiger. It is a way to search your hard drive to find the file you need. That sounds pretty simple doesn’t it? Well, it is.

Spotlight always knows what is on your hard drive. It doesn’t have to go through a periodic process to update its index. If you have a Finder window open with “aubergine” in the search field, and let’s just say you don’t have any files that refer to eggplant as aubergine, the window will be empty because it could not find that word in anything. Now add a new document named “ratatouille” and type “aubergine” in the document somewhere. Immediately after you save that document, the ratatouille file will appear in your Finder window.

That example was meant to illustrate how quickly Spotlight knows about what is on you computer. But, it also illustrates another feature of Spotlight. The ability to search for stuff inside of files. And it does that just as swiftly. But it doesn’t end with finding text inside of a document, you can search to see which photos you took with a Nikon camera instead of your Canon. You can search for anything on one of the cards in your Address Book. You can search for almost anything.

The easiest way to use Spotlight is to click on the magnifying glass icon in the right side of your menu bar – Apple has a guideline of always putting the search field in the top-right corner of a screen or window. A search field will drop down that you can start typing into. Wait… now might be a good time for me to explain what I mean when I say “search field.” Everyone knows what a text field is, it’s a place to store some text that the user types in or that the computer fills in. Apple has a distinct version of a text field that they call a search field. They’re immediately recognizable because they have rounded sides giving them a pill-like appearance. There will be a magnifying glass in the left side of some of them. If that icon has a little downward facing triangle next to it, you can click on the icon to select recent searches you’ve made.

OK, with that bit of exposition out of the way, lets get back to the Spotlight menu. As I was saying, it is in the top-right corner of the screen. Click on the Spotlight icon and type something into the search field. As you are typing Spotlight will begin searching your computer and returning results. For example, aubergine begins with “au.” If I have anything about Australia, it will show up in the Spotlight menu until I type the “b” in aubergine. Yes, it’s that quick. The Spotlight menu categorizes everything it finds and will return the first few items for each category. If what you’re looking for isn’t there, select the Show All item at the top of the menu. This will open a Finder window with all of the results. By the way, you can rearrange categories and eliminate specific ones from the Spotlight menu by changing your System Preferences for Spotlight. There is also a preference for hiding specific locations from Spotlight.
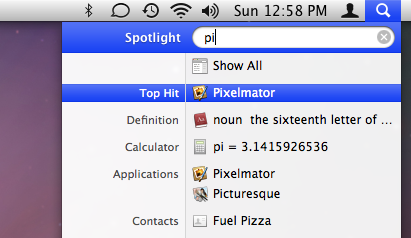
Get familiar with the Spotlight menu, it's a real time-saver

Get familiar with the Spotlight menu, it's a real time-saver

I said this is the easiest way to use Spotlight. It is and it is also one of the easiest and quickest ways to launch an application. If Spotlight finds an application that’s name matches your search term, that application will be the Top Hit. For example, when I want to launch Pixelmator, I use the Command+Space keyboard shortcut to open the Spotlight menu and then type “pi” followed by the Return key. Since Pixelmator is my Top Hit, it is already highlighted and hitting Return will open it. If I wanted to open my contact card for Fuel Pizza, I would use the down arrow key to move the highlight down until I had selected Fuel Pizza and hit Return. You can also select items from the menu with your mouse.

Have you ever tried to open a file from inside an application and had trouble remembering where it is? No need to answer; that was a rhetorical question. I know the answer is “yes” because it happens to all of us. With Spotlight, you don’t need to remember where it is. Just remember enough about the file so that Spotlight can find it. Every File Open window in Mac OS X has a search field in the top-right corner. Enter your search terms in there and the contents of the sheet will show the results. As with the Finder, you’ll also see a little Spotlight toolbar at the top of the results area. This will allow you to refine your search. It will have a few file locations that you can limit the results to. But, it also has a plus button that adds additional layers of refinement to your search. Clicking that plus button allows you to refine your search by all sorts of things like the kind of file, the camera aperture setting for each photo, and the bit rate of audio files.

This should get you well on your way to becoming a Spotlight guru. Let me know what questions you have about Spotlight and I’ll answer them.

Keeping your Mac’s Trash in the corner

One of the first things I do on any new Mac is change the Dock so that my Trash is always in the corner rather than floating around as icons are added or removed from the Dock. This makes it very easy to drag items to the Trash because it’s always in the same spot. It’ll always be in the bottom-right corner if your Dock is positioned on the bottom or the right of the screen. And Trash will be in the bottom-left corner if your Dock is positioned on the left of the screen.

You have to set the Dock preferences so that the end of the Dock is pinned to the edge of the screen. But wait, that doesn’t show up in System Preferences for the Dock! Instead, you have to use the Terminal to enter some commands to set a hidden preference. This is really easy to do even if you’re not comfortable with the Terminal application or command line interfaces in general. But, typing the wrong thing into the Terminal can be fairly destructive – you’ve been warned. If you’re ready, Terminal can be found in the Utilities folder within your Applications folder.

Just type the following commands into Terminal one after the other and your Dock will disappear for a second and when it comes back the Trash will be in the corner.

defaults write com.apple.Dock pinning end

killall Dock

Video stabilization & more with iMovie ’09

I’ve put together an example of what you can do with the new iMovie ’09. I recorded the video this weekend using a Canon HG10 high definition video camcorder. I then edited it using iMovie ’09. I didn’t spend a long time editing this movie. I let iMovie make most of the decisions and as a result was done in less than 30 minutes.

Themes

Themes are a new feature for iMovie ’09 that iMovie ’08 did not have. Older versions of iMovie did have themes as well, but they were one of the features removed when Apple completely re-wrote iMovie for 2008. iMovie currently has five themes: Photo Album, Bulletin Board, Comic Book, Scrapbook, and Filmstrip. Apple generally adds to the selection every time a new version of iLife comes out. You can select the theme you wish to use when creating a new project and you can optionally tell iMovie to add transitions and titles. You can also change them or remove them from either the titles or transition section.

My video has the Comic Book theme applied to it. The theme is responsible for generating all of the animated transitions and titles. In fact, it was also responsible for the placement of them all except for two lower-third titles that I placed at about 5:04 into the video.

Video Stabilization

iMovie analyzed all of my video for stabilization right after it was done importing it from my camera. That took about two hours for around 18 minutes of footage (you could reduce this by telling iMovie exactly what you want to smooth the camera movement for, but I let it run over night) This analysis lets iMovie know how to alter the video to reduce camera shake and make your camera movement smoother.

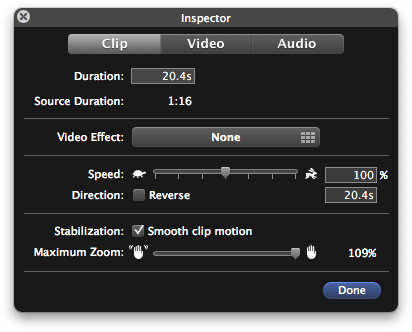
Another one of the tricks iMovie uses is zooming in to help it reduce shakiness. It gives you a slider that allows you to adjust the level of zoom to use to stabilize your video. And, your clip will have an icon that changes as you adjust the slider to show you how well iMovie can stabilize that video clip.

iMovie '09's Clip Inspector lets you adjust the zoom used to stabilize your video

iMovie '09's Clip Inspector lets you adjust the zoom used to stabilize your video

All of the clips used have video stabilization enabled and I left them at the zoom factor that iMovie picked for each. You can see two things about video stabilization in the end result. It does a good job of smoothing out the camera shake – all of my video was shot with the camera in one hand and a coffee in the other. And there is a waviness to some of the stabilized video – apparently this is a result of the CMOS sensor my camera uses. According to Apple, you’ll get better results with other cameras.

The example video is below, and you can see the same video without stabilization on YouTube.

Notes

The soundtrack for this video is courtesy of Nine Inch Nails through Creative Commons Attribution-Noncommercial-Share Alike licensing and the songs appear on the “Ghosts I-IV” album. The first song is “18 Ghosts II” and the second song is “24 Ghosts III.”

Multi-button mousing with your Mac

One of the biggest issues that detractors of the Mac have had over the years is that Macs don’t work with two-button mouses. And one of the curious things about detractors of the Mac is that they apparently have never used one. Macs work with multi-button mouses. They have done so for years. Until recently, Apple only sold one-button mouses, but Mac OS X has supported multi-button mouses since it was first released on March 24, 2001. Apple now only sells multi-button mouses.

The multiple button Mighty Mouse that Apple designed retains the overall form of the Apple Mouse that it replaced and works as a single-button mouse for those that don’t feel the need for multiple buttons and to reduce stress on the index finger since the mouse can be clicked with your entire hand.

So, if you feel the need to right-click, you’ll want to change your system preferences since the mouse defaults to acting like one with a single button. System Preferences are accessed through the Apple menu in the menu bar. Select the Keyboard & Mouse icon that is in the Hardware grouping. Then select the Mouse tab at the top of the window and you’ll see all of the preferences you can set for your mouse. By default both the left and right side of the mouse are set to act as the primary button. Regardless of which side of the mouse you click on, it’ll always register as a “left-click.” So, you’ll want to set one of those to the secondary button. If you’re a right-hander, then you will be most comfortable setting the right side to the secondary button. Keep in mind that the secondary button is registered if only that side is touched when you click the mouse. I really like this feature because I can still use the mouse like a single-button mouse (clicking with my entire hand), and when I need to context-click on something I just click on the right side of the mouse.

You can also set what happens when you click either the scroll ball or the side buttons. There is a key on your keyboard that will activate the Dashboard, so I don’t understand why Apple defaulted the scroll ball to this function. And, the Exposé key on your keyboard will reveal all windows for you, so the side buttons could also be put to better use. My recommendation is to use the two extra mouse buttons for Exposé, but you can set them to whatever you want. I’ve got the scroll ball set to show me the windows for my current application (Exposé – App Windows) and the side buttons set to expose the desktop (Exposé – Desktop). I feel this is best because if you’re going to your desktop, you’re probably going to be dragging something to or from it and dragging works well with the side buttons. You can also see from the screen shot that I increased the tracking speed to be closer to what I was used to on Windows. Adjust this slider to whatever makes you comfortable.

Now you’re all set. You can close the system preferences and use the mouse the way you want to from here on out. Just remember that if you have more than one account set up on your Mac, the other people can configure their own preferences for the mouse. So, you can turn on all of the buttons on your account but make all of them (including the scroll ball and side buttons) act as the primary button for your young child’s account.