Tag Archives: how to

How to remove icons from your menu bar

When you first start using your Mac, you may have quite a few items in your menu bar. I don’t feel the need for the Bluetooth or Input menu items and I prefer an uncluttered look, so I’ll remove them. But how do you do that?

You can easily remove any of these icons you don't need.

You can easily remove any of these icons you don't need.

There’s nothing in each one’s menu to allow you to remove them and there aren’t easy to find settings for them in System Preferences (though, they are usually scattered around there). If you want to remove one, just hold down the (Command) key and drag it out of the menu bar. Lift your finger to stop dragging once you’re clear of the menu bar and poof it’s gone. This is similar to how you can drag icons out of your Dock  – only with that you don’t need to hold down the option key.

How to turn off an iPhone

I almost never turn my iPhone off. But, if I am out and about and far away from a power outlet or my charging cable there are sometimes that I have to turn it off to save my battery. If you find yourself in a similar situation hold the lock (or sleep) button on the top of the phone down until you see the “slide to power off” slider – about 3 seconds. You can also try this if your phone is acting strange. On the rare occasions something is not quite right, switching my phone off and then turning it back on (by holding down the same button until the Apple icon appears) will have everything back to normal.

8 tips for new iPhone users

Recently a couple of friends got their first iPhones and asked me for some help on how to do a few things. I thought that I should document these tips as well as a couple of extra ones on how to use some of the less easily discovered features of the iPhone. I’ll also let you know about some of my favorite applications and games.

How do you add applications to the iPhone?

There are two ways to get new applications into your phone. You can download them from the iTunes Store on your Mac or PC and then synchronize your iPhone with iTunes. As long as you have your phone set to synchronize applications (this preference is on the Applications tab after selecting your phone in iTunes’ sources list), it’ll automatically add the new applications to your phone.

App Store iconThe other way to add new applications is to run the App Store application directly from your iPhone. You can download any application directly to your iPhone and it will be synchronized back to iTunes the next time. If the application is larger than 20 Megabytes, then you must be connected to a Wi-Fi network in order to download it.

How do you remove applications from the iPhone?

This is easy to do, but isn’t very intuitive. All you have to do it place your finger on the application you want to remove and hold it there until the icons start to jiggle. The applications you can remove will all have an X button in the top left corner of their icon. Tapping this button will remove the application from your iPhone and will also tell iTunes not to synchronize the application back to your phone again – unless you re-select it on the Applications tab of your iPhone’s iTunes preferences.

Tapping on the X button will remove any of these apps

Tapping on the X button will remove any of these apps

How do I re-arrange the application icons?

As described in the above tip, just hold your finger over an application until the icons start to shake. The application icon will grow in size and become translucent to indicate that you have grabbed it. You can then drag the application to wherever you’d like it and you’ll see the icons re-organize themselves. If you want to drag it to another page, just hold your finger to the left or right side of the screen until the next page slides into view. While the icons are jiggling around, you can drag and drop any of them to re-order your applications.

What are the fastest ways to call people?

First off, if you haven’t done this, add some people to your Favorites list in the Phone application. You can click the plus button in the top-right corner to select one of your contacts to add to your Favorites. You can also add someone to your Favorites as you’re looking at their address card. Simply select someone from the Contacts tab of the Phone application or the stand-alone Contacts application, and scroll all the way to the bottom of their card. Tap the Add to Favorites button that shows up on the bottom right. If this person has more than one number, you’ll be prompted to select which one you want to add to your Favorites. This ensures that every person on your Favorites list can be called with just one tap.

If you need to call one of your favorite people at a different number than the one that shows up in your Favorites list, tapping the blue detail disclosure button to the right of their name will take you to their card and allow you to dial any of their other numbers, send them a text message, write them an e-mail, etc.

Have you ever been in the middle of a texting conversation when you realize it’d just be easier to talk on the phone? Scroll all the way to the top of your text view and tap on the Call button. If your conversation is long, the quickest way to scroll to the top of the view is to tap on the status bar at the top of the screen that contains your battery and signal indicators – it’ll snap you directly to the top.

Maybe it'd be a good idea to use this phone for... talking

Maybe it'd be a good idea to use this phone for... talking

You can do the same thing with e-mail. If you want to talk to someone rather than reply to their mail, tapping on their name will take you to their contact card and you can call them from there. This works for anyone in the header of your e-mail regardless of whether it was a message you received or sent or whether the person was directly addressed or not. This is also an easy way to start a card for a new contact. Their name and e-mail address will be pre-filled for you.

Tap the detail disclosure button to talk to your local barista

Tap the detail disclosure button to talk to your local barista

The Maps application is also a good place to start a call. If you were using it to get directions to a friend’s house but are having trouble finding it, you can click on the blue detail disclosure button next to their name after tapping the red destination pin. I also use Maps as a way to find the number of local restaurants and other places. Just tap on the detail disclosure button on the label for any of the pins that drop in after you search for something.

What is the best way to delete e-mail?

Obviously, you can delete a message while you’re reading it by clicking on the trash can button in the toolbar at the bottom of the screen. But, you can also quickly delete a message after reading its summary in your inbox by swiping your finger left to right across the row for that piece of mail. Then just tap the Delete button to confirm that you really want to delete it or tap the Done button to cancel.

What if there are a lot of messages that you want to clear out of your inbox (or any other folder)? You can tap the Edit button in the top-right corner of the screen. It’ll change the list to editing mode that gives you a circle to the left of every message and Delete and Move buttons at the bottom of the screen. Tap on the circle to fill it in with a check mark for every message that you want to get rid of. If you accidentally selected a mail in error, you can tap the check mark to undo your selection. Once you’ve selected everything, tap either Delete or Move.

How do I reset the iPhone?

If one of your applications freezes and you need to stop it so that you can get back to using your phone, there are three things you can try. The first thing to do is to double-tap the home button to pull up the app switching tray. From there, tap and hold the icon until they start to jiggle and then quit the app by tapping the red circle with the dash in it. If that doesn’t work, try turning off the iPhone by holding down the lock button on the top of the phone until a “slide to shutdown” control appears. If not, you’ll have to resort to resetting your iPhone by holding down both the home and lock buttons for around 10 seconds until the Apple logo appears in the middle of the screen.

Apple has a page that helps you trouble shoot this problem if this doesn’t work for you.

What are some great applications?

Amazon Mobile is a great application for shopping at Amazon. Searching returns an easy to read list with photos and pricing information. And once you select a product it gives you a lot of information summarized nicely with the option to drill down for more info. It also works with the iPhone’s camera by allowing you to take photos of things that it will then try to find via Amazon Remembers while you continue shopping. When it finds a similar (or the exact same) product, you can easily buy it right there.

Deliveries is a utility app that tracks the shipping status of any deliveries you have. You can enter tracking numbers for a variety of different courier services and it even synchronizes with a companion Dashboard Widget for the Mac.

Remote is an application from Apple that gives you the ability to remotely control either iTunes or an Apple TV. I use this all of the time to pick what music I want to listen to on my Apple TV.

Shazam is an application that listens to music in the environment around you and identifies it for you! That really speaks for itself. But it will also remember songs it has identified in the past and will link you to iTunes, YouTube, and more for any song that it recognizes. And in my experience, that is most songs.

Articles is a great way to read Wikipedia. It reformats all of the encyclopedia entries in a way that is very easy to read on an iPhone. Like with Safari, you can have many articles open at once and switch between them easily. It can also be used to find a word or phrase within long Wikipedia entries. And Articles has a really great image viewer built in. This is as close as you can get to having The Hitchhiker’s Guide to the Galaxy in your pocket.

Yelp is a really good application for finding the best restaurants, cafés, bars, etc. around you and getting a good idea of whether you should go there based on the reviews done by the Yelp community.

What are some great games?

Burning Monkey Casino is a stylish app with an array of casino-themed games to play including slots, blackjack, video poker, money wheel, pachinko, scratch-and-win cards, and 3 Card Monty. You even can “cheat” at pachinko by tilting your iPhone. The Burning Monkey Casino also has a lounge act and stand-up comedian for your pleasure.

Deep Green is a very cleanly designed chess game. You can play against another person or the Deep Green chess engine (which has adjustable strength). You can undo your moves all the way to the start and you can also have your next move suggested to you. Deep Green also remembers the game between play sessions.

Koi Pond is a way to relax with your iPhone. It’s basically what it sounds like, with nicely rendered fish swimming around in a virtual pond. You can cause ripples by tapping the screen or moving your finger across the face of the water. But that scares the fish away. If you leave your finger in one spot on the screen the koi will come nibble at it. You can feed the fish by shaking your iPhone. They even added rain to their most recent update.

Morocco is cool take on Reversi (also known as Othello). This reminds me a lot of Deep Green. It’s very cleanly done, has multiple difficulties, and remembers your game when you quit the application.

Rolando is close to the perfect iPhone game. You control the characters by tilting the iPhone to the left or right and you interact with them and the environment by tapping on the screen or a variety of other gestures. If you’ve ever heard of Loco Roco for the PSP, this is the way that game should have been.

Super Monkey Ball is a new version of a great video game that has appeared on several gaming systems including the Wii. But, it feels the most natural on the iPhone. You tilt the iPhone to control which way the monkey ball rolls. Doing this, you’ll roll around the labyrinthine levels collecting coins and racing your way to the finish line.

Trism is one of the first games to come out for the iPhone. And it, like Rolando, incorporates touch & tilt as key parts of the game play. Slide the Chiclet-like triangles around to match up three or more pieces of the same color to annihilate the pieces and then tilt the phone to control which pieces slide into the space left behind. Maybe you should listen to The B-52’s while playing this game.

WordJong is what you get when you combine mah-jongg and Scrabble. Letters replace the Chinese characters on the mah-jongg tiles. And you’re taking letters off the board instead of placing them on it as in Scrabble. A new puzzle is given to all players of the game every day, so you can compete for bragging rights with your friends.

Protecting yourself and your iPhone’s data

The iPhone is a fantastic personal assistant. It gives you access to incredible amounts of your data at your finger-tips. You have all of your contacts in it, your schedule is available with a single tap of Calendar, Photos has pictures of your friends and family, Mail has all of your latest correspondence, and Safari is probably logged into your Amazon.com account. What would happen if you lost it?

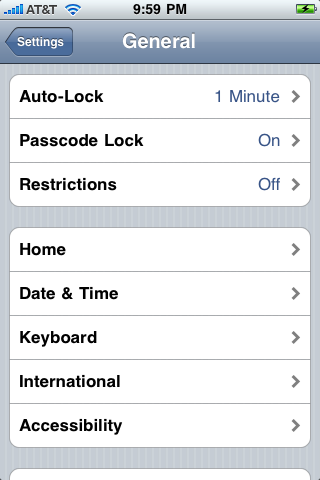
Frankly, a lot could happen if you lost it. So, let’s look at the features the iPhone provides you to prevent any of your data getting into the wrong hands. You can set the iPhone to auto-lock in 1, 2, 3, 4, 5 minutes or never. This basically turns the iPhone’s screen off and prevents you from accidentally making calls or doing anything else. I’ve got mine set to 2 minutes. This gives me plenty of time between actions (like reading a web page before scrolling) and is short enough to save some battery life due to the screen being off. Anyone can still pick up your phone and use it, though.

Settings for Auto-Lock and Passcode Lock are in the General settings

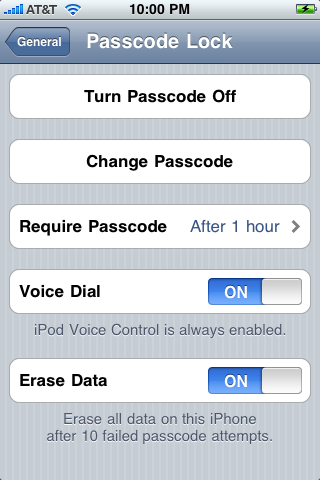
Another thing that will help protect you is to turn on the passcode lock. After turning this on you will have to enter a four digit code in order to be able to use the iPhone for anything other than answering calls, making emergency calls, or operating the iPod from the lock screen. There is a range of times you can set to require the passcode to unlock your phone from immediately up to four hours. I’ve got mine set to one hour so that I am not constantly entering the passcode to unlock my phone. After being locked for over an hour, I’ll have to enter the passcode to use it again. I feel this is an acceptable bargain between security and convenience for me, but you may wish to use a shorter period of time. If someone else were to pick up my phone within that hour and try to change this setting, they wouldn’t be able to do so unless they knew my passcode.

Passcode Lock settings including the Erase Data feature

An additional layer of security that I recommend everyone take is to also turn on the Erase Data feature within the Passcode Lock settings. Since someone could luck-out in trying to figure out your passcode by entering a variety of different four digit codes, this feature gives them (or you) 10 tries before it erases all of your data on it as a security precaution. Think of this as the iPhone’s equivalent to the ATM taking your card if you enter the wrong passcode too many times.

An additional setting is the ability to turn off SMS previews if you don’t want anyone to see any of the text messages you’ve received without first unlocking your phone.

How to take screenshots with iOS

Did you know you can take screenshots with iOS? Taking a screenshot is pretty easy to do. All that you have to do is simultaneously press the Lock button (on the top-right, sometimes referred to as the Sleep/Wake button) and the Home button. You’ll see the entire screen flash white and hear a camera shutter sound indicating that you’ve successfully taken a shot.

The iPhone's Photos application

But where is it? There isn’t a desktop or a clipboard for the shot to be placed on. Instead, press the Home button and select the Photos application. You’ll find your screenshots in the Camera Roll photo album.

The Camera Roll album

So, what can you do with it? They are synchronized to your PC just like you can with normal photos you’ve taken while out and about. But, you can also use it from within some of your apps like Twitterrific so you can your upload images to Twitter.

How to take screenshots on your Mac

Taking a screenshot in Mac OS X is very similar to the way you do it in Windows. There are two kinds of screenshots to take in Windows. You can take a screenshot of your full screen by pressing the Print Screen key. You can also take a screenshot of just the current window by pressing Alt and then pressing the Print Screen key. Both of these keyboard shortcuts place the image in the clipboard so that you can paste them wherever you like. Some people like pasting them into a Word Document while others paste them into Paint to save them or simply just paste them wherever they need to use it – like an e-mail.

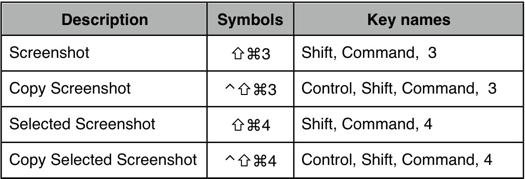
Keyboard shortcuts for taking screenshots

Keyboard shortcuts for taking screenshots

On the Mac, you basically have the same two kinds of screenshots. You can take a full screenshot by holding the Shift and Command keys while pressing the 3 key. Doing so will result in the screenshot being saved to your desktop as a PNG image file.

You can also take a partial (or selective) screenshot. But, on the Mac you’re not limited to just taking a shot of your current window. Holding the Shift and Command keys while pressing the 4 key will change your pointer into a cross-hair with two sets of numbers indicating the coordinates of the current pointer position. You can click-and-drag the cross-hair to draw a rectangle on the screen that frames whatever portion you want a screenshot of. If you’d rather just take a screenshot of a window, simply move the cross-hair over the window you want a shot of and press the Spacebar. Your pointer will turn into a camera and the window that you’ll take a shot of will be highlighted. Click to take a shot of the currently highlighted window.

Both of these methods will will result in the screenshot being saved to your desktop as a PNG image file. But, if you don’t have a need to save the shot as an image and just need to use it temporarily, you can modify either of those two keyboard shortcuts by also holding down Control before hitting either 3 or 4. This will place the shot into your clipboard and you can then paste as you usually would wherever you’d like. Using the extra Control key modifier will give you a behavior more like Windows.

Ease into the switch

I became a Mac user in 2001. Before that I primarily used Windows. In this article (and in future ones on this site) I’m going to show you how to make the switch yourself.

Apple’s Get a Mac ad campaign has driven a lot of Windows users to Apple stores as well as to Apple’s Web site in search of more information about the platform. Apple tells us that over half of all Macs sold at Apple retail stores were to customers who were new to the Mac.

I also believe that Mac OS X Leopard (10.5) is a big draw for new users. There are a lot of great features it has that are enticing to people used to Windows. Mac OS X was the driving force in my interest in the Mac platform and I bought my first Mac, an iBook, when Apple started preloading it on their computers instead of Mac OS 9.

So, if you’re contemplating a switch to Mac, or if you’re just getting frustrated with Windows, this article is for you. It should also prove beneficial to new Mac users. And finally, if you know someone who is thinking of taking the leap, send them a link to this article. My hope is that this information will help people make the right decision.

Yes, it works with multi-button mouses

Let’s start by dispelling a myth. Macintoshes work with multi-button mouses. They’ve supported multi-button mouses in every version of Mac OS X that has shipped. And they have sold the Mighty Mouse, a four-button mouse with a multi-direction scroll ball, since August 2, 2005. Today, the Mighty Mouse is the only mouse sold by Apple or shipped with any Mac.

Making the best Dock

One of the first things you’ll want to do is drag your Applications folder to the Dock. The Dock is the strip of icons located at the bottom of your screen by default. This will provide you with a quick way to launch your applications in a way that is similar to the Windows Start Menu.

Click on the Finder icon in the Dock (it’s the first icon on the left) to launch a Finder window. Select Go from the menu-bar (at the top of your screen) and then select Computer. Double-click on the hard drive icon – it should be labeled Macintosh HD. You’ll see a folder labeled Applications, which has a make-shift letter “A” on it. Drag that folder to your Dock and place it to the right of the dotted line. From now on you’ll have easy access to all of your Applications.

Once you’ve dragged the Applications folder to your dock, I recommend setting it to display as a folder so that it is easily recognizable by the Applications’ folder icon. You can do this by context-clicking (right-clicking) on the Applications stack in the Dock and setting it to display as a folder.

If you have folders in your Applications folder that you want to be able to quickly launch applications from, you should display a list when you click on your Applications stack. You can do this by context-clicking on the Applications stack in the Dock and setting it to view content as a list. After doing this, simply hovering over the folder in the list with your pointer will reveal the contents of that folder.
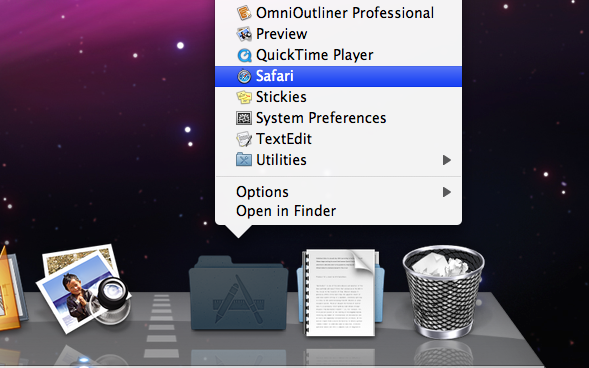
The Applications Stack list

The Applications Stack list

Some other folders that you may or may not find handy to have in the Dock are your Home folder (it’s named after your username) and your Documents folder. There should already be a stack for your Downloads folder in the Dock.

Another neat trick is to turn on magnification, yet set the magnification to a low level. I have mine set somewhere below 25 percent. This causes magnification to kick in only when you’ve placed enough icons or minimized enough windows to make the size dip below the threshold. You’ll never have to worry about icons in the Dock being too small. Setting magnification is easy. Simply context-click on the Dock (use the dividing line as a target) and select Dock Preferences… then adjust the sliders to meet your preferences or set it similar to what you see in the screenshot.

Preferences for the Dock

Preferences for the Dock

To put new applications in your Dock all you have to do is drag the application file to the Dock and it’ll be there from then on. You can also context-click on the icon of any running application and select Keep In Dock. Removing applications from the Dock is just as easy: simply drag it out of the Dock and the icon will disappear in a puff of smoke – literally. Don’t worry, your application will still be fine. It’s merely the icon in the Dock that has vanished.

Switching tasks as well as computers

Task switching in Mac OS X is a bit different than in Windows. You’ll need to use Command+Tab instead of Alt+Tab to switch between applications. Thankfully, the keys are in about the same location. All you have to do to switch to the last used application is hit Command+Tab. Hold down Command and repeatedly hit Tab to go further down the list. Holding down Shift reverses the direction with each repeated press of the Tab key. You can hit Q while you have an application icon highlighted to quit it and H to hide it.

Something the Mac does that Windows does not is give you the ability to quickly switch between open windows for your current application. Simply press Command+` (the ~ key) to cycle through the active application’s windows. This behaves similarly to switching between applications. Check out what happens when you repeatedly hit the ` key or begin holding down Shift.

Do you see the signs?

Apple takes advantage of using symbols to represent certain key-presses in menus and elsewhere in the operating system. However, if you don’t know what these symbols mean, you’ll be lost, as I was for at least a week or so. That’s why I created this cheat sheet for you. Below you’ll see an image I created that you can save for reference in your first few days of Mac use.

Symbols representing the Command, Option, and Shift keys

Symbols representing the Shift, Command, and Option keys

When you read Mac articles and books, you’ll see these symbols. Depending on your keyboard, they might not be that easy to figure out, so here’s a key you can refer to.

Get the combinations

Windows borrowed a lot of key combinations from the Macintosh, so it shouldn’t take you too long to get used to them here. However, there are several other combinations that Apple has standardized, which are missing from Windows. Next you’ll see a layout of many useful commands with their corresponding key-press symbols.
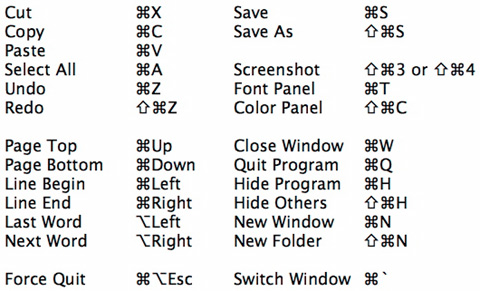
Common Keyboard Shortcuts you can use almost anywhere

Common Keyboard Shortcuts you can use almost anywhere

Feel free to print this image out and tack it up to your wall for a few weeks.

The Finder

The Finder is the Mac equivalent of Window’s Explorer. Most users don’t even know what Explorer is in Windows because it is normally accessed via the My Computer icon. On the Mac you access the file browser through the Finder icon in the Dock, or alternatively, from disks you may have mounted on your desktop.

In Explorer, pressing Enter while you have a file selected will either open the file or run it. In Finder, pressing Enter allows you to rename the file. To open the file, you should use the Command+O key combo. At first this may sound counter-intuitive to a Windows user – as it did to me. The explanation I have heard is that Macs tend to have the default action be one that is non-destructive. Using Enter to open a file could be seen as disruptive, if not destructive, and if for some reason you enter rename mode by accident, hitting Enter again will end rename mode with no changes made. I’ve come to enjoy the quick access of renaming a file because I do that rather frequently, and Command+O is easy to use and remember.

You’ll get a lot of use out of the Command key while using Finder. Command+O also opens a folder if it happens to be the selected item. You need to use the key combination Command+Delete instead of simply hitting the delete key to delete files. It’s great. Apple has made deleting files deliberate without the use of annoying prompts. Command, when used in conjunction with the [ and ] keys will issue back and forward commands respectively. This will function much like the buttons in any web browser. Speaking of web browsers, these same key-presses will also work in Safari and most other web browsers on the Mac.

While Finder is active, clicking on its menu in the menu-bar will give you access to the Finder preferences. I would advise settings the option to have New Finder windows open Home. It will give you fast access to all of your documents and files, and since your Applications folder will be in the Dock you’ll rarely need to access other folders on your hard drive. In the same vein, I would uncheck the option for showing hard disks on the desktop–unless you just can’t get away from having something like Window’s “My Computer” on your desktop.

The Mac OS X Finder gives you four ways to view your files: as icons, in a list, as columns, and Cover Flow. Icon view shows icons of any size from 16-by-16 pixels (that’s pretty small) to 128-by-128 pixels (mammoth in relation to Windows’ icons), along with labels displaying the filenames below or to the right, and optionally, some additional information about the file. Folders are intermixed with files according to your configured arrangement order.

List view lists all the file and folders in your current folder and places a disclosure triangle next to folders. You can expand folders and the triangle will point down to reflect the fact that Finder is now also displaying the folder’s files indented below it.

Column view is very useful – it has one column for each folder. Deeper folders are displayed to the right and more shallow folders to the left. If you have a file selected, the right-most column will display a preview of the file. I’m using this view as I write this article to sample some MP3 files, without having to run iTunes or QuickTime.

Cover Flow combines list view with another area on top of it that shows high quality previews of whatever file you have selected. If you have a movie selected, you can even play it through this view.

You can type Command+J to access the options for any of these views in the Finder.

You can copy and paste files in the Finder just like you do in Windows via the Command+C and Command+V combinations or the menubar. However, you cannot cut files. That’s a good thing. Microsoft chose to implement cut in a way that is inconsistent with the standard cut, copy, and paste metaphor. The only way to do it so that it is consistent is also dangerous. You don’t want to cut files and wind up losing them because you forgot to paste them.

Using applications

Installing applications is very easy on the Mac. When you first begin using one, you may think to yourself that it is too easy. If you were to download OmniGraffle for instance, all you have to do to install it is drag the OmniGraffle icon to your Applications folder.
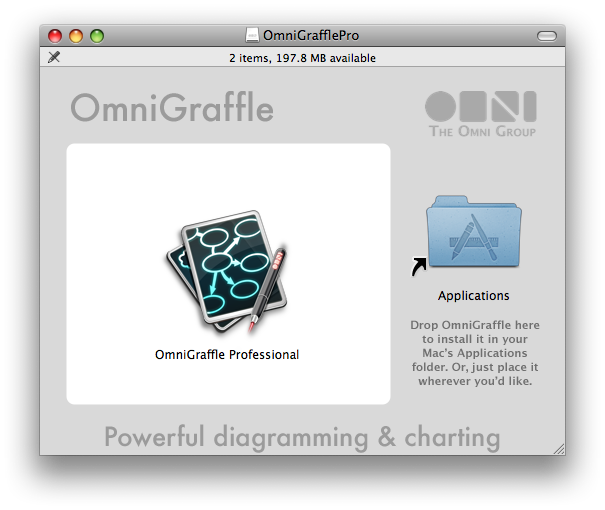
Installing applications is as easy as dragging and dropping

Installing applications is as easy as dragging and dropping

One of the most difficult things for me to initially understand when I switched to the Mac was uninstalling an application. During my first week I wanted to remove an application from the system and immediately opened System Preferences to look for an uninstaller. I searched around for quite a while trying to find an equivalent to the Add or Remove Programs control panel I was familiar with in Windows. I finally figured out that all you have to do is drag the undesirable application to the trash. Now this is the way computing should be!