Tag Archives: keyboard shortcut

What is Spotlight?

Spotlight is a feature that was added to the Mac a while back with the release of Mac OS X Tiger. It is a way to search your hard drive to find the file you need. That sounds pretty simple doesn’t it? Well, it is.

Spotlight always knows what is on your hard drive. It doesn’t have to go through a periodic process to update its index. If you have a Finder window open with “aubergine” in the search field, and let’s just say you don’t have any files that refer to eggplant as aubergine, the window will be empty because it could not find that word in anything. Now add a new document named “ratatouille” and type “aubergine” in the document somewhere. Immediately after you save that document, the ratatouille file will appear in your Finder window.

That example was meant to illustrate how quickly Spotlight knows about what is on you computer. But, it also illustrates another feature of Spotlight. The ability to search for stuff inside of files. And it does that just as swiftly. But it doesn’t end with finding text inside of a document, you can search to see which photos you took with a Nikon camera instead of your Canon. You can search for anything on one of the cards in your Address Book. You can search for almost anything.

The easiest way to use Spotlight is to click on the magnifying glass icon in the right side of your menu bar – Apple has a guideline of always putting the search field in the top-right corner of a screen or window. A search field will drop down that you can start typing into. Wait… now might be a good time for me to explain what I mean when I say “search field.” Everyone knows what a text field is, it’s a place to store some text that the user types in or that the computer fills in. Apple has a distinct version of a text field that they call a search field. They’re immediately recognizable because they have rounded sides giving them a pill-like appearance. There will be a magnifying glass in the left side of some of them. If that icon has a little downward facing triangle next to it, you can click on the icon to select recent searches you’ve made.

OK, with that bit of exposition out of the way, lets get back to the Spotlight menu. As I was saying, it is in the top-right corner of the screen. Click on the Spotlight icon and type something into the search field. As you are typing Spotlight will begin searching your computer and returning results. For example, aubergine begins with “au.” If I have anything about Australia, it will show up in the Spotlight menu until I type the “b” in aubergine. Yes, it’s that quick. The Spotlight menu categorizes everything it finds and will return the first few items for each category. If what you’re looking for isn’t there, select the Show All item at the top of the menu. This will open a Finder window with all of the results. By the way, you can rearrange categories and eliminate specific ones from the Spotlight menu by changing your System Preferences for Spotlight. There is also a preference for hiding specific locations from Spotlight.

Get familiar with the Spotlight menu, it's a real time-saver

Get familiar with the Spotlight menu, it's a real time-saver

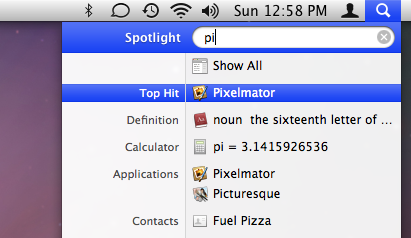
I said this is the easiest way to use Spotlight. It is and it is also one of the easiest and quickest ways to launch an application. If Spotlight finds an application that’s name matches your search term, that application will be the Top Hit. For example, when I want to launch Pixelmator, I use the Command+Space keyboard shortcut to open the Spotlight menu and then type “pi” followed by the Return key. Since Pixelmator is my Top Hit, it is already highlighted and hitting Return will open it. If I wanted to open my contact card for Fuel Pizza, I would use the down arrow key to move the highlight down until I had selected Fuel Pizza and hit Return. You can also select items from the menu with your mouse.

Have you ever tried to open a file from inside an application and had trouble remembering where it is? No need to answer; that was a rhetorical question. I know the answer is “yes” because it happens to all of us. With Spotlight, you don’t need to remember where it is. Just remember enough about the file so that Spotlight can find it. Every File Open window in Mac OS X has a search field in the top-right corner. Enter your search terms in there and the contents of the sheet will show the results. As with the Finder, you’ll also see a little Spotlight toolbar at the top of the results area. This will allow you to refine your search. It will have a few file locations that you can limit the results to. But, it also has a plus button that adds additional layers of refinement to your search. Clicking that plus button allows you to refine your search by all sorts of things like the kind of file, the camera aperture setting for each photo, and the bit rate of audio files.

This should get you well on your way to becoming a Spotlight guru. Let me know what questions you have about Spotlight and I’ll answer them.

What is Exposé?

Exposé is a feature of Mac OS X that allows you to see all of your open windows at any time. All you have to do is press the function key labeled with the Exposé icon on your keyboard (F3) and all of your windows will slide around to reveal other windows behind them – shrinking when necessary. It also dims the desktop so that the windows really pop out from the background. You can then move your pointer over one to see the title of that window. Clicking while over a window will switch to that window and every window will resize itself back to normal and slide back to where it was.

This is very useful for finding the window you want to be working in at the moment. It might be better than using the Command+` keyboard shortcut depending on how you like to work. But, it has even more usefulness than that. If you’re working in one window and you want to drag something out of it into a different window, Exposé works for that too. All you have to do is:

  1. start your drag
  2. activate Exposé
  3. hover over the window that you want to drop onto
  4. deactivate Exposé
  5. complete your drag & drop

Quickly tapping the Exposé key will reveal the windows and they’ll hang there in space waiting for you to do something. But, if you hold down the Exposé key, the windows will rearrange themselves only for as long as you hold down the key. Once you lift your finger, the windows will go back to normal. Holding the Exposé key is a good way to handle dragging & dropping.

You can also activate Exposé through a variety of ways that can be set in your System Preferences. Select the Exposé & Spaces System Preference and you can set Exposé to activate by moving your pointer to one of the four screen corners, typing keystrokes, or clicking mouse buttons.

The normal behavior for the Exposé key is exposing All Windows. Holding the Command key while pressing the Exposé key will move all the windows out of the way to reveal the Desktop. This is helpful since current Apple keyboards only have one function key labeled with the Exposé icon. Using the Command modifier key means you don’t have to remember which other unlabeled function key you may have assigned the Exposé – Desktop command to. Use the same keyboard shortcut to bring the windows back to normal (if you aren’t using the hold method from above). You can also modify the behavior of Exposé by holding the Control key while pressing the Exposé key to show only the current Application Windows. Again, use the same keyboard shortcut to bring the windows back to normal. Finally, for some fun, you can hold down the Shift key while pressing the Exposé key to watch the animations in slow-motion.

How to take screenshots on your Mac

Taking a screenshot in Mac OS X is very similar to the way you do it in Windows. There are two kinds of screenshots to take in Windows. You can take a screenshot of your full screen by pressing the Print Screen key. You can also take a screenshot of just the current window by pressing Alt and then pressing the Print Screen key. Both of these keyboard shortcuts place the image in the clipboard so that you can paste them wherever you like. Some people like pasting them into a Word Document while others paste them into Paint to save them or simply just paste them wherever they need to use it – like an e-mail.

Keyboard shortcuts for taking screenshots

Keyboard shortcuts for taking screenshots

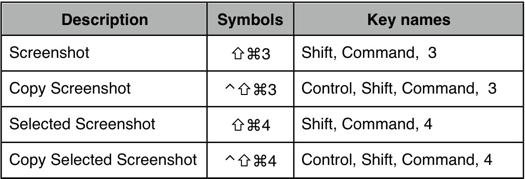
On the Mac, you basically have the same two kinds of screenshots. You can take a full screenshot by holding the Shift and Command keys while pressing the 3 key. Doing so will result in the screenshot being saved to your desktop as a PNG image file.

You can also take a partial (or selective) screenshot. But, on the Mac you’re not limited to just taking a shot of your current window. Holding the Shift and Command keys while pressing the 4 key will change your pointer into a cross-hair with two sets of numbers indicating the coordinates of the current pointer position. You can click-and-drag the cross-hair to draw a rectangle on the screen that frames whatever portion you want a screenshot of. If you’d rather just take a screenshot of a window, simply move the cross-hair over the window you want a shot of and press the Spacebar. Your pointer will turn into a camera and the window that you’ll take a shot of will be highlighted. Click to take a shot of the currently highlighted window.

Both of these methods will will result in the screenshot being saved to your desktop as a PNG image file. But, if you don’t have a need to save the shot as an image and just need to use it temporarily, you can modify either of those two keyboard shortcuts by also holding down Control before hitting either 3 or 4. This will place the shot into your clipboard and you can then paste as you usually would wherever you’d like. Using the extra Control key modifier will give you a behavior more like Windows.